I recently decided to simplify our lives and get rid of anything we don't use regularly or love. I am an organized person and don't keep clutter but there were still things that I was holding onto that didn't get used. Some of the things I am talking about include lotions that I didn't really love and therefore didn't use, hair products that I bought but that didn't work for me for whatever reason (some of which were only used a few times!), old make-up ( I had a lot of expensive make up that I hadn't used in years and it had to go!), old clothes that I just didn't wear, anything that we had two of, shoes that I haven't worn, etc. Basically, if we haven't used it in the past year, we don't need it.
I started by doing a small amount each day. I'm obviously busy with two young girls but when I get focused, I can get a lot done! I started going through areas of the house while the girls were sleeping in the afternoons. One very important thing that I did to make this a fast task was make very quick decisions. Either "yes, keep" or "no, go". Fast, fast, fast! If I wasn't sure, then it needed to go. I got through so much in record time. I think that taking too much time to go through stuff can cause second guessing, over thinking, and can lead to keeping unnecessary items.
I had one bag for donating and one for trash. We have ARC come to our house to pick up donations once a month and that has made this process massively easier. I started collecting all the donation items in the dining room in boxes. I just kept getting more and more full! I was so excited to get rid of these items from our lives.
I got motivated to do this "house cleanse" by the website Flylady.net- a wonderful organizing/cleaning/life website. I love the ideas and concepts on Flylady and has really helped me to stay focused and get so much done everyday.
So, as I started getting rid of belongings that we no longer needed or wanted, I noticed a very interesting transformation begin to develop in my mind. I was feeling freer, happier, and more peaceful. I found that resentment that I had been holding on to was starting to dissapate and I was no longer angry at people I had been upset with. I literally felt like getting rid of physical stuff cleared up my mentality. I was bettter able to focus on myself and my family too. I felt so incontrol and free. It has been very liberating, It's wonderful to only have items that we use often and love in our house and nothing else. Everything has a place, and if it doesn't I either make it a home or get rid of it. I kept saying to myself, "has this been used since last summer?" I was amazed at how often the answer was "no". I was also amazed at how little stuff I really need and use regularly. I have my favorites of things and the rest just sits there in the way.
I think that people have a tendency to keep items for various reasons. Some of these reasons include feeling bad for giving it away (maybe it was from someone special to you, maybe it was expensive, maybe your just stubborn), you've gotten used to the item, you worry that you may need it someday, it's connected with memories... I have learned that you don't need to keep an item inorder for a memory or loved one to live on. I don't love my grandma more becuase I kept her old and tattered cook book. My love for her is inside me and nothing physical can even come close to the feelings that I have for her. I can let the stuff go.
Another thing that I would think to myself is how an item makes me feel. If it makes me feel yucky, sad, frustrated, etc then it goes. As hubby and I were going through a kitchen cabnet the other night, we discovered that we both hated this particular item but we kept it because we thought the other person liked it. If it doesn't make you smile, it can go.
I was also supprised at how much the "house cleanse" spread. I started it and didn't even tell hubby what I was doing. A few days later I noticed that he had started going through his stuff and eliminating items without me even saying anything! I guess that actions really do speak louder than words. If I had asked him to organize, he would have complained but since he just saw me doing it and joined in, I didn't have to nag!
So, yes, less is more! I will always keep our house this minimal, simple, and organized. If there are areas in which things get messy, then I know that stuff has to go. It is constant maintenance but it eliminates so much work and frees my mind to be present in the moment with my girls.
Wednesday, September 11, 2013
Tuesday, September 10, 2013
How we do it: Shipping Breast Milk
I have a large over supply of breast milk and since I pump all of Lulu's bottles, it's easy to see how much milk we have. I make more than double what Lulu needs. So, I started accumulating a huge amount of extra milk in the freezer (like hundreds of ounces!) and needed to do something about it! Sure, I could decrease the amount I make but I really don't think that I am pumping all that much. I pump 4-5 (usually 5) times per day for 10 minutes. Since I have a well set schedule, I only have one pumping session in which the girls are up and around for and that one occcurs while hubby is home so he can tend to them. All the other times the girls are either sleeping or in independent play. Anyway, I found a friend of mine in Cali who needs the breast milk for her baby so every few weeks I send her a shipment of milk. Here is how I do it:
1. Set up a package pick up through FedEx
2. Purchase all the items needed. To ship breast milk you will need:
-Styrophome coolers (sold at the grocery store)
-Large box to hold coolers
-Newspapers (I get these from my grandpa- old people always have newspapers :)
-Dry ice (I get 16 pounds)
-Dry ice sticker (from FedEx office)
-Address sticker (also from FedEx office)
-Large ZipZock bags
-Packaging tape

3. Label the box "Human Breast Milk"

4. Put all the breast milk into large Ziploc bags.

4. Break up the dry ice using a hammer. The dry ice comes in large cubes and needs to be broken into smaller pieces to fit into the cooler.


5. Pour one bag of dry ice (one fourth of the total amount of dry ice) into the bottom of one of the coolers.


7. Place the large bags of breast milk into the cooler on top of the newspaper. Make sure that none of the dry ice is touching the plastic bags. It can go through the plastic and ruin breast milk.

8. Put a layer of newspaper on top of the frozen milk and pour another bag of dry ice on the newspaper. Again, make sure none of the dry ice is touching the milk.

9. Put the lid on the cooler and tape with packing tape.

10. Put the coolers into the large box.


12. Place on porch for FedEx person to pick up. It's usually really heavy so I have to be careful.

Then they just come a get it and it's off! I check in with my friend the next day to make sure that she got it and that everything went fine.
1. Set up a package pick up through FedEx
2. Purchase all the items needed. To ship breast milk you will need:
-Styrophome coolers (sold at the grocery store)
-Large box to hold coolers
-Newspapers (I get these from my grandpa- old people always have newspapers :)
-Dry ice (I get 16 pounds)
-Dry ice sticker (from FedEx office)
-Address sticker (also from FedEx office)
-Large ZipZock bags
-Packaging tape

3. Label the box "Human Breast Milk"

4. Put all the breast milk into large Ziploc bags.

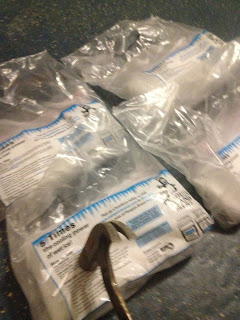
4. Break up the dry ice using a hammer. The dry ice comes in large cubes and needs to be broken into smaller pieces to fit into the cooler.

This is the dry ice in cubes. It comes in bags.

Hit it with a hammer.

5. Pour one bag of dry ice (one fourth of the total amount of dry ice) into the bottom of one of the coolers.

It's difficult to see, but this is the cooler with the dry ice on the bottom.
6. Cover with newspaper.

7. Place the large bags of breast milk into the cooler on top of the newspaper. Make sure that none of the dry ice is touching the plastic bags. It can go through the plastic and ruin breast milk.

8. Put a layer of newspaper on top of the frozen milk and pour another bag of dry ice on the newspaper. Again, make sure none of the dry ice is touching the milk.

9. Put the lid on the cooler and tape with packing tape.

10. Put the coolers into the large box.


11. Tape up box and put the dry ice sticker on along with the address sticker. Make sure all parts are filled out and the weight of the dry ice is accurate (they freak out about this).


12. Place on porch for FedEx person to pick up. It's usually really heavy so I have to be careful.

Then they just come a get it and it's off! I check in with my friend the next day to make sure that she got it and that everything went fine.
Sunday, August 25, 2013
How we do it: Science Time
Tink has Learning Time after Independent Play almost every day (usually not on weekends or if we have errands to run at that time). It ends up happening around 10/10:15 and lasts until she gets tired of it. I will go over Learning Time in a different post. After Learning Time we have what I call a "Learning Activity". This is basically just some sort of fun activity for her to do. It can be painting, coloring, crafts of some sort, and often it's Science Time. Tink loves Science Time! It's really simple and easy to do. All I do is get a bunch of containers from around the house (tupperwear, old yogurt containers, anything really) and put them out on her play table on the patio in the backyard (it can be messy!). Then I add a varitey of substances to the containers and give her utensiles to mix with. Some of the substances that we use are baby rice powder, powdered sugar, oatmeal, sand, water, water with food coloring, something we call "goop" which is Xanthan Gum blended with water, etc. (Side note: I discovered the "goop" while I was trying to find a way to thicken Lulu's bottles and some moms suggested Xanthan gum. It did not work for Lulu's bottles but was very fun to play with so I gave the "goop" to Tink to play with and we've been using it ever since)
This is a pic of the Science Time set up that I put out for her to play with. These are the containers of fun stuff. There is one with water, one with bubbles, one with powdered sugar, and one with flour. I limit the amount of mixing ingredients to 4 because I find that it's a good amount to experiment with but not overwhelming.
 Here is the whole set up:
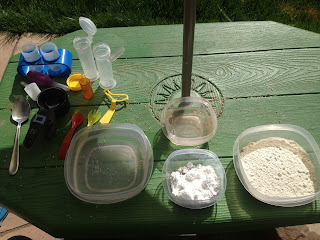 I give her a variety of tools to mix with and just leave her to explore. She focuses really well and basically zones out the world. She mixes, pours, scoops, etc to her hearts content. Then, when she's done, she just tells me and we move on to something else. I do make sure to clean up Science Time because the mixtures can get pretty gross and attract insects. I just pour everything down the drain or pour into the trash and put everything into the dishwasher. Super easy!
This is a pic of the Science Time set up that I put out for her to play with. These are the containers of fun stuff. There is one with water, one with bubbles, one with powdered sugar, and one with flour. I limit the amount of mixing ingredients to 4 because I find that it's a good amount to experiment with but not overwhelming.


Friday, August 16, 2013
How we do it: Compounding Zegerid
Lulu has reflux and after trying several meds, we have found success with a Zegerid/Omeprazole mixture. Actually, Zegerid is Omeprazole just with sodium bicarbonate added as a buffer to make it immediate release but anyway...
I am going to go over how I compound (mix) her meds. The items that I use are:
-Medicine bottle
-Tums 1000- I use berry flavor but any flavor is fine
-Omepraloze tablets- I have tried using the capsules but I have found that getting the super tiny beads into the bottle is far more difficult that crushing the tablets and pouring it in.
-Zegerid capsules
-A pill crusher (bought at Walmart)
-A funnel (not pictured)- I have Hubby make me one out of paper.

I start by putting 95mL of water into a medicine bottle. I like the medicine bottles from Target best. I just go up to the pharmacy and ask for a few empty medicine bottles with the plugy top thingy and a few syringes. The ones from Target have a plug that goes into the top once you are done making it and this feature makes it much easier to administer the meds. I have found that it's easiest to get the 95 mL by filling the medicine bottle to 100 mL and then removing 5 mL with a syringe.
I add 5 1000 strength Tums to the water. I break each Tums into 4 pieces and plop them right in.


 Once they are all added to the water, I shake, shake, shake! I then place the bottle into the fridge and leave it over night so that the Tums can dissolve. Every time I open the fridge, I shake the bottle to speed up the dissolving process.
The next morning...
I get out 5 20mg Omeprazole tablets and crush each one individually in the pill crusher. I have found that crushing them individually is far more effective than trying to crush all 5 pills at once in the pill crusher (actually, trying to crush all 5 at once did not work).

 This is a pic of the pill crusher. You put the tablet in and turn the top until the tablet crumbles.
 They break apart into powder and chunks. I just tilt the pill crusher to the side and tap it until all the material is gathered on one side. Then I place the very awesome and scientific funnel (made of a small piece of paper :) into the top of the medicine bottle.

 I then pour the Omeprazole powder/chunks into the water/Tums mixture and shake.
 Next, I get out 5 Zegerid capsules.
 I use these little scissors (also purchased at Walmart) to poke a hole into the Zegerid. I think they are actually cuticle scissors or something. I found them in the nail polish section.
 I poke a small hole into one side of the Zegerid capsule.
 I squeeze the Zegerid powder into the bottle until it's all out.
 This is the size of the hole and what the empty capsule looks like.
 Once I've done this with all 5 Zegerid pills, I put the pluggy thing in the top.
 Then I put the lid on and shake, shake, shake. The compound is then placed in the fridge, usually for another 24 hours before I use it. Just be sure everything's dissolved before administering.
 When the compound (mixture) has settled in the fridge, it looks like this and has distinct layers. That is normal and is why you must shake it very well before dosing.
 Once it's time to give medicine, I just insert the syringe and pull out the appropriate dose.
The first time that I made it, I was a bit intimidated but have found that it's actually very easy and since the Omeprazole is mixed with the Zegerid it can be given any time (no timing around meals!). This is very important and is one of the main reasons I switched Lulu to Zegerid. She pretty much eats all day and never has a long period of time in which she has an empty stomach- especially since starting solids.
I am going to go over how I compound (mix) her meds. The items that I use are:
-Medicine bottle
-Tums 1000- I use berry flavor but any flavor is fine
-Omepraloze tablets- I have tried using the capsules but I have found that getting the super tiny beads into the bottle is far more difficult that crushing the tablets and pouring it in.
-Zegerid capsules
-A pill crusher (bought at Walmart)
-A funnel (not pictured)- I have Hubby make me one out of paper.

I start by putting 95mL of water into a medicine bottle. I like the medicine bottles from Target best. I just go up to the pharmacy and ask for a few empty medicine bottles with the plugy top thingy and a few syringes. The ones from Target have a plug that goes into the top once you are done making it and this feature makes it much easier to administer the meds. I have found that it's easiest to get the 95 mL by filling the medicine bottle to 100 mL and then removing 5 mL with a syringe.
I add 5 1000 strength Tums to the water. I break each Tums into 4 pieces and plop them right in.


The next morning...
I get out 5 20mg Omeprazole tablets and crush each one individually in the pill crusher. I have found that crushing them individually is far more effective than trying to crush all 5 pills at once in the pill crusher (actually, trying to crush all 5 at once did not work).


Our funnel


The first time that I made it, I was a bit intimidated but have found that it's actually very easy and since the Omeprazole is mixed with the Zegerid it can be given any time (no timing around meals!). This is very important and is one of the main reasons I switched Lulu to Zegerid. She pretty much eats all day and never has a long period of time in which she has an empty stomach- especially since starting solids.
How we do it: Making baby food
I made all of Tinks baby food and I plan to do the same for Lulu. I love making them their baby food and I feel like it's so much more nutritious than store bought. Many moms that I have talked to would like to make baby food but often feel intimidated. It is actually much easier than it seems. Here are my step-by-step directions for making baby food:
1. Buy the ingredients. For Lulu this means buying a few sweet potatoes and pears. These are the two foods other than rice and oatmeal cereal that she has eaten. I will be adding squash, apples, banana, and avocado in the next few weeks. I will show pictures of making sweet potatoes and pears.
2. Peel the veggie/fruit.


3. Cut it up. For the pears, I use an apple slicer and for the potatoes, I cut it into small cubes.


4. Put into Babycook. I have a Beaba Babycook that I got from Wiliams-Sonoma and I love it! It is wonderful because it does everything and I only have to use one appliance to cook and blend the food.
 5. Add water to the Babycook and turn to steam.
6. Once the food is steamed, remove the steam basket from the steamer. Pour the water into a different container.


7. Pour the steamed food back into the blender.

8. Try blending the food. If it's too thick, then add in some water. The pears need little to no water added but the sweet potatoes need a lot of water to achieve the desired consistency. I add the water that I poured out previously. This water contains nutrients and is superior to simply adding plain water.

9. Blend until desired consistency is achieved.

10. Once I am happy with the consistency, I get out the cleaned ice trays. I have ice trays that have lids which I highly recommend because it makes it easier to store them in the freezer. I then pour/scoop the baby food into the ice cube trays and then place into the freezer.


11. Place into freezer.

12. Get baby food ice cubes for the next day out and put into fridge the night before feeding. I have a few containers with lids that hold the ice cubes. I plan a few cubes per meal.

13. Warm the baby food. I warm it in the microwave for a few seconds and test it to be sure of the temp. If it's too think, I add breast milk to thin it. If I need more food or forgot to get it out the night before, then I just heat the frozen cubes until they are slightly warm.
14. Feed to baby!
Ok, so it looks like a lot of steps, but really it's so easy! Plus, Lulu loves it and I know exactly what is in her food. I store the cubes in plastic bags in the freezer and I will explain storage of frozen baby food in another post.
1. Buy the ingredients. For Lulu this means buying a few sweet potatoes and pears. These are the two foods other than rice and oatmeal cereal that she has eaten. I will be adding squash, apples, banana, and avocado in the next few weeks. I will show pictures of making sweet potatoes and pears.
2. Peel the veggie/fruit.


3. Cut it up. For the pears, I use an apple slicer and for the potatoes, I cut it into small cubes.


4. Put into Babycook. I have a Beaba Babycook that I got from Wiliams-Sonoma and I love it! It is wonderful because it does everything and I only have to use one appliance to cook and blend the food.

6. Once the food is steamed, remove the steam basket from the steamer. Pour the water into a different container.


7. Pour the steamed food back into the blender.

8. Try blending the food. If it's too thick, then add in some water. The pears need little to no water added but the sweet potatoes need a lot of water to achieve the desired consistency. I add the water that I poured out previously. This water contains nutrients and is superior to simply adding plain water.

9. Blend until desired consistency is achieved.

10. Once I am happy with the consistency, I get out the cleaned ice trays. I have ice trays that have lids which I highly recommend because it makes it easier to store them in the freezer. I then pour/scoop the baby food into the ice cube trays and then place into the freezer.


11. Place into freezer.

12. Get baby food ice cubes for the next day out and put into fridge the night before feeding. I have a few containers with lids that hold the ice cubes. I plan a few cubes per meal.

13. Warm the baby food. I warm it in the microwave for a few seconds and test it to be sure of the temp. If it's too think, I add breast milk to thin it. If I need more food or forgot to get it out the night before, then I just heat the frozen cubes until they are slightly warm.
14. Feed to baby!
Ok, so it looks like a lot of steps, but really it's so easy! Plus, Lulu loves it and I know exactly what is in her food. I store the cubes in plastic bags in the freezer and I will explain storage of frozen baby food in another post.
Subscribe to:
Comments (Atom)